Using RVMed Ruby in Mac Automator Workflow

HINT This content is obsoleted on OSX 10.9 Mavericks

Embed Ruby into Automator Workflow

Automator workflow has the ability to execute ruby code, but it is not that obvious if you doesn’t know it.

To embed ruby code into workflow, you need to create a “Run Shell Script” action first, then choose “/usr/bin/ruby” as the shell. Then the script in the text box will be parsed and executed as ruby code.
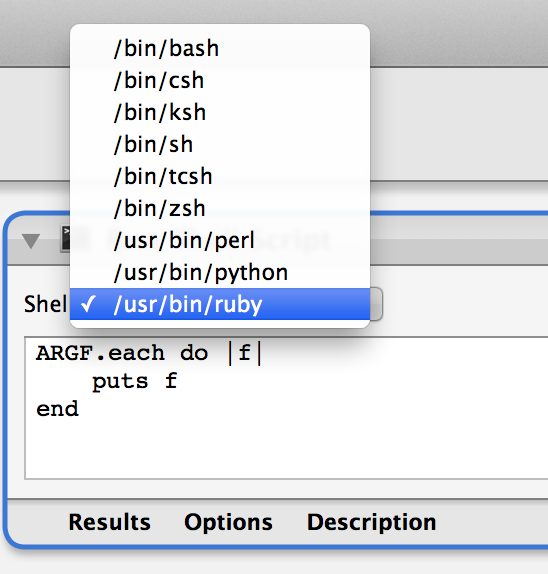
Ruby In Automator

So, from now on, you know how to embed ruby into automator workflow.

Use RVM ruby instead of System Ruby

By default, Automator will load system ruby at /usr/bin/ruby, which is ruby v1.8.7 without bundler support. For most ruby developers, they must have installed some kind of ruby version manager, such as RVM or rbenv. As to me, I uses RVM. So I wish I could use RVMed versions of Ruby rather than the system ruby, could be ruby 1.9.3 or even ruby 2.0 with bundler support.

To use the RVMed ruby, I tried several approaches by hacking different configurations or files. And at last, I made it doing this:

RVM provides a ruby executable file at ~/.rvm/bin/ruby. On the other hand, /usr/bin/ruby is actually a symbol link that pointed to ‘/System/Library/Frameworks/Ruby.framework/Versions/Current/usr/bin/ruby’.

So what we need to do is to replace the the symbol link with a new one pointed to ~/.rvm/bin/ruby.

Replace system ruby with RVMed ruby
1
2
3
4
sudo mv /usr/bin/ruby /usr/bin/system_ruby
sudo ln -s /Users/timnew/.rvm/bin/ruby /usr/bin/ruby

(You might need to replace the /Users/timnew/.rvm/bin/ruby with the path to your ruby executable file)

After doing this, done, you have the RVMed ruby in your Automator Workflow.

You can try to excute the following code in Workflow to verify it:

Test Ruby Version
1
puts RUBY_VERSION

If you do it correct, then you should see ‘1.9.3’ or any other version of ruby you have configured.

Mac OS X case-insensitive file system pitfall

I was working on the YouTube video playback feature for LiveHall last night, and have it works successfully on my local devbox, which is running Mac OS X. Then I deployed the code to Heroku, without any regression.

But today morning, when I have the demonstrate the new features, I met server error! It says 1 of the 4 javascripts are missing, so the Jade template failed to render.

This is a very wield issue, then I try the same data on my local dev box once again, and it works perfect! But it does yield error on the production! Then I tried to use heroku toolbelt to run ls command on the production, and I found the there are 4 coffee scripts there.
Then I tried to enforce heroku to redeploy the app by using git push --force, but the issue remains!
Then I even tried to dive into the dependency pacakges connect-assets and snockets, but still found nothing useful.

Same code, same data, but different result! Very odd issue!

After half an hour fighting against the code, I suddenly noticed I the file name is RevealJSPresenter.coffee, whose “S” is capital S! And I reference the file with name #= require ./presenter/RevealJsPresenter, whose ‘s’ is a lowercase ‘s’!

And snockets depends on the OS feature to locate the file. On my local dev environment, I’m using Mac. Although OS X allow user to explicitly format the HFS+ into file name case sensitive mode, but it is case insensitive by default. So snockets can locate the file even the case is wrong.
But once I have deployed to heroku, which, I assume, runs Linux, whose file system is absolutely filename case sensitive. So the snockets won’t be able to locate the file due to the case issue.

To resolve the bug, I renamed my file in RubyMine, then try to commit in terminal.
But when I commit, I met another very interesting issue, that git says there is no file changed, so it refused to commit.
It is still the same issue, due to FS is case insensitive, git cannot detect the renaming.

This problem is more common when coding on Windows, but CI or production runs on Linux. And the very common solution is to pull the code in case sensitive environment, then rename the file and commit it.

But I found another more easier way to do it:

Using git mv in terminal to rename the file, which will enforce git to track the file renaming action.

Or

Most of Git GUIs are able to track file name case changing, so you can try to commit the change with the tool, such as RubyMine or SourceTree.

How to launch Mac OS Terminal as Interactive Shell rather than Log-in Shell

As described in previous post, Mac OS launch its terminal as Log-In shell rather than Interactive Shell, which is different to default behavior of Unix and Linux. As a result, Terminal will load “bash_profile” as its profile rather than the normal “bashrc”.

This unique behavior might cause some problem when you try to port CLI tool from Unix or Linux.
Because basically, the ported app infers that the bash_profile should be loaded only once, and only when user just logged in. But in Mac OS, this inference is wrong, which can cause some weird problem.

This default behavior sometimes is annoying, and in fact, this Mac OS Terminal’s “unique” behavior can be configured. And even more, you can use other shell program, such as ksh, rather than the default bash.

Mac user can customize this behavior in Terminal’s Preferences dialog of Terminal app.
Terminal Preferences Dialog

If you choose the command to launch bash, the launched shell will become a interactive shell, which will load .bashrc file rather than .bash_profile file.

Bash Profile on Mac OS X

In Linux and Unix world, there are 2 common used shell profiles: ~/.bashrc and ~/.bash_profile. These two profiles are usually used to initialize user bash environment, but there still are some slightly differences between them two.
According to bash manual, .bashrc is “interactive-shell startup file”, and .bash_profile is “login-shell startup file”.

What’s the difference between interactive-shell and login-shell

Basically, the login-shell means the shell opened when user log in via console. It could be the shell opened on local computer after you entered correct user name and password, or the shell opened when you ssh to a remote host.
So according to the bash_profile will be loaded only once, that’s right after you logged into a computer, either locally or remotely.

And, on the other hand, the interactive-shell could be more widely used, be seen more often. It is the shell opened after you logged in, such as the shell opened from KDE or Gnome.

Mac Terminal’s Pitfall

According to the manual, the Terminal App on Mac is the typical “interactive-shell”, so theoretically Terminal should load “.bashrc” to initialize the shell environment. But the fact is Terminal doesn’t load the “.bashrc”, instead it load “.bash_profile” for initialization.
So in a word, Mac’s Terminal doesn’t follow the routine strictly. We need to be aware it.

And not all the shell are interactive! If the shell is not interactive, the Terminal App won’t load the profile file to initialize the environment.
A typical non-interactive shell in the shell that TextMate used to run command script, which means in TextMate’s shell, these environment variables, path and even alias you used in you daily life might not be available for TextMate’s command.
And also the most hurt one, the rvm function also won’t be available in TextMate’s command shell, which means if you call rake or rails in TextMate’s command script, you are very possibly got error because it cannot find proper gem or other resources.
So you should always remember to source and run the “.bash_profile” file or setup these values once again.